How to make your bed like a pro: A step-by step guide
CGN089 // Shutterstock
How to make your bed like a pro: A step-by step guide
You spend nearly a third of your life in bed. But is the way you make your bed supporting your comfort, your health, and the longevity of your mattress?
We all know how to make our beds … kind of. For something we do day after day, bed-making can be surprisingly confusing. There’s a lot of elements, and some are required while others are not. But how do you know?
Plus, there are all the questions no one really knows the answer to off the top of their head. Like, should your mattress topper go under or over the protector pad? What’s the trick to putting on a duvet cover without turning it into a wrestling match? And are hospital corners really worth it?
These small decisions can make a big difference, especially when you’ve invested in certified organic materials designed to support better sleep. Naturepedic shares a smart, simplified way to layer your bed from the foundation up.
Why Making Your Bed Matters
Let’s start with a simple truth: how you make your bed sets the tone for how you’ll sleep. Your bedding layers influence everything from your comfort and temperature to how long your mattress lasts.
Making your bed might seem like a small, inconsequential thing, but it can be an opportunity to care for your space, your sleep, and overall health. Research has linked the chore to success and even better sleep hygiene. Because it’s the first task of the day, completing it can provide a sense of accomplishment with an increased release of dopamine. The dopamine reinforces the behavior, and you’ll feel motivated to follow through on other tasks too. Next thing you know, it’s time for bed again and you have an entire to-do list completed.
If you’re a person who feels their heart racing when they see a mess, there’s more good news about making your bed. Because tidying up your bed reduces visual clutter, it can also reduce stress and anxiety. Studies show that just the presence of clutter can lead to feeling stressed, so you might notice feeling less anxiety throughout the day when your bed is made.
How to Layer a Bed Like a Pro
There’s more to a well-made bed than just tossing on a comforter and calling it a day. Here’s a simple order of operations to guide you — complete with a visual breakdown to see exactly how each layer stacks up.
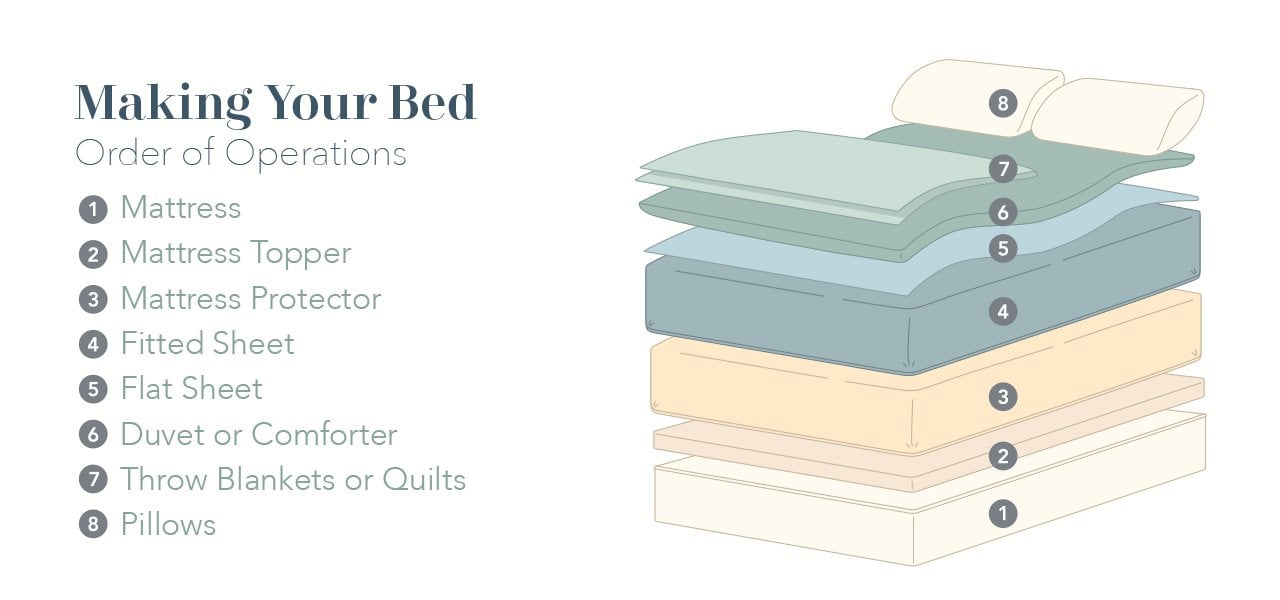
Naturepedic
Step One: Mattress First
Let’s start with your base layer: your mattress. Ideally, it’s clean, supportive, and tailored to your unique sleep needs. Whether that means cushiony comfort or firm support for you, your mattress sets the tone for everything else that goes on top.
Let’s give the mattress a quick checkup. Is it positioned correctly on the frame or foundation? Any signs of wear or sagging? If it’s a flippable or rotatable mattress, this is your cue to rotate it 180 degrees to help prevent uneven wear.
If you’ve invested in a certified organic mattress, like one made with latex instead of memory foam and encased with organic cotton instead of polyester, you’re off to an excellent start. These materials support healthier sleep and also hold up better over time, especially when you protect them with the right layers (more on that incoming … ).
Optional Step Two: Add a Mattress Topper!
Want to fine-tune your comfort? Add a plush mattress topper. Adding one can provide extra pressure relief, more support, or just an extra indulgent feel. An organic mattress topper can provide that extra touch without having to invest in a whole new mattress.
Tip: Your mattress topper should go under the protector pad — more on that next.
Step Three: Add a Mattress Protector
Think of this as your mattress’s insurance policy. A quality protector pad helps extend the life of your mattress (and your topper too, if you have one) by shielding against spills, sweat, allergens, and general day-to-day wear. An organic waterproof protector pad can add a breathable, comfortable layer of protection without the noisy, plasticky feel associated with conventional waterproof materials.
Because the protector is meant to shield the mattress (and topper), it should be the layer closest to your sheet set. Make sure it’s smooth and snug around the corners before moving on.
Step Four: Slip on the Fitted Sheet
Ah, the fitted sheet. It might not be the easiest to fold, but it’s the easiest to love once it’s on your bed. It’s the first layer of comfort that’s actually touching your skin, so it plays a key role in how your bed feels.
The type of fabric you choose for your fitted sheet can impact everything from texture to maintenance to your body temperature while you sleep, it’s worth exploring different fabrics (like linen versus cotton sheets) and different weaves (like percale versus sateen) to find the right fit for your preferences and environment.
Pro Tip: How to Fold a Fitted Sheet
You’ve probably seen complicated fitted-sheet folding methods online that involve tucking corner into corner, turning the sheet inside out, etc., but all you really need to fold a fitted sheet well is a flat surface!
- Lay the sheet out as flat as you can and smooth it down.
- Fold the sides in thirds like a tri-fold poster, then in half to create a long rectangle.
- Fold your long rectangle into thirds lengthwise.
Done! Neat, compact, and no corner origami required.
Step Five: Layer the Flat Sheet
Not everyone uses a flat sheet, but it can add an extra touch of softness and warmth (and help keep your duvet cleaner longer). When adding a flat sheet, place the finished side facing down so it’s smooth against your skin, let it drape evenly on both sides, and tuck the bottom under the mattress to secure it.
Want hotel-worthy style? Try hospital corners for a tailored look. Tuck the foot of the sheet under the mattress, pull the sides up into a triangle and tuck the triangle’s edge under the mattress to secure it. Or … just do your best. You’re not running a five-star resort (unless you are — in which case, carry on).
Step 6: Duvet or Comforter
This is where things get cozy! Now is when you can begin to really tailor the look and feel of your bed for aesthetics.
Wait, what’s the difference between a duvet and a comforter? A comforter is ready to go out of the box (or linen closet), no cover required. Just give it a fluff and lay it on. A duvet is a two-piece system: the insert and the duvet cover. Think of it like a pillow and pillowcase.
Pro Tip: Use to Burrito Method to Put on a Duvet Cover
Lay your duvet cover inside out on the bed, place the insert on top, then roll them up together like a burrito. Flip the cover over the ends, unroll and — voilà! — It’s perfectly in place, no wrestling match required.
Steps Seven and Eight: Finishing Touches
Pillows please! Your sleep setup isn’t complete without them, and how you place them matters. Start with your primary sleeping pillows at the top of the bed, either laying flat or stacked for a plush, hotel-style look. If you use pillow protectors, layer those under your pillowcases to help extend the life of your pillows. From there, feel free to add any extras: Euro shams for structure, decorative pillows for color, or lumbar pillows for balance. Just make sure your sleep pillow stays easy to access when it’s time to crawl in.
Finally, add the cozy layers that make your bed yours. A folded quilt, throw blanket or textured coverlet at the foot of the bed adds visual interest and an extra layer for chilly nights. Some people like to tuck the sides for a crisp, tailored look. Others prefer a relaxed drape. You do you.
Now step back and admire your work. When your bed is made, your day is made.
This story was produced by Naturepedic and reviewed and distributed by Stacker.
![]()


